Showing posts with label testing. Show all posts

Saturday, March 06, 2021

Creating Temporary Files with JUnit 5

This post shows you how to perform unit testing using temporary files with JUnit 5. If you're still on JUnit 4, please check out my previous post!

In JUnit 5, the @TempDir annotation is used to indicate that a field or method parameter of type Path or File is a temporary directory. Each test will use its own temporary directory and when the test method has finished executing, the directory and all its contents will be deleted. (If you want to share a temporary directory between tests, you need to make the field static.)

Here is an example:

import static org.hamcrest.CoreMatchers.*;
import static org.hamcrest.MatcherAssert.*;

import java.io.IOException;
import java.nio.file.Files;
import java.nio.file.Path;

import org.junit.jupiter.api.Test;
import org.junit.jupiter.api.io.TempDir;

public class MyTest {

  @TempDir
  Path tempDir;

  @Test
  public void testWrite() throws IOException {

    // Create a temporary file.
    // This is guaranteed to be deleted after the test finishes.
    final Path tempFile = Files.createFile(tempDir.resolve("myfile.txt"));

    // Write something to it.
    Files.writeString(tempFile, "Hello World");

    // Read it.
    final String s = Files.readString(tempFile);

    // Check that what was written is correct.
    assertThat("Hello World", is(s));
  }
}

Related post: JUnit: Creating Temporary Files using the TemporaryFolder @Rule

Tuesday, December 01, 2020

Parameterized Tests in JUnit 5

A parameterized test allows you to run a test against a varying set of data. If you find yourself calling the same test but with different inputs, over and over again, a parameterized test would help make your code cleaner. To create one in JUnit 5 you need to:

  • Annotate the test method with @ParameterizedTest
  • Annotate the test method with at lease one source e.g. @ValueSource
  • Consume the arguments in the test method

The sections below describe some of the commonly used source annotations you can use to provide inputs to your test methods.

@ValueSource
This annotation lets you specify a single array of literal values that will be passed to your test method one by one, as shown in the example below:

@ParameterizedTest
@ValueSource(ints = {2, 4, 6})
void testIsEven(final int i) {
  assertTrue(i % 2 == 0);
}

@CsvSource
This annotation allows you to specify an array of comma-separated values, which is useful if your test method takes multiple arguments. If you have a large number of arguments, you can use an ArgumentsAccessor to extract the arguments as opposed to creating a method with a long parameter list. For example:

@ParameterizedTest(name = "Person with name {0} and age {1}")
@CsvSource({ "Alice, 28",
             "Bob, 30" })
void testPerson(final String name, final int age) {
  final Person p = new Person(name, age);
  assertThat(p.getName(), is(name));
  assertThat(p.getAge(), is(age));
}

@ParameterizedTest(name = "Person with name {0} and age {1}")
@CsvSource({ "Alice, 28",
             "Bob, 30" })
void testPersonWithArgumentAccessor(final ArgumentsAccessor arguments) {
  final String name = arguments.getString(0);
  final int age = arguments.getInteger(1);
  final Person p = new Person(name, age);
  assertThat(p.getName(), is(name));
  assertThat(p.getAge(), is(age));
}

By the way, note how I have also customised the display name of the test using the {0} and {1} argument placeholders.

@CsvFileSource
This annotation is similar to CsvSource but allows you to load your test inputs from a CSV file on the classpath. For example:

@ParameterizedTest(name = "Person with name {0} and age {1}")
@CsvFileSource(resources = { "data.csv" })
void testPerson(final String name, final int age) {
  final Person p = new Person(name, age);
  assertThat(p.getName(), is(name));
  assertThat(p.getAge(), is(age));
}

@MethodSource
This annotation allows you to specify a factory method which returns a stream of objects to be passed to your test method. If your test method has multiple arguments, your factory method should return a stream of Arguments instances as shown in the example below:

import static org.junit.jupiter.params.provider.Arguments.*;

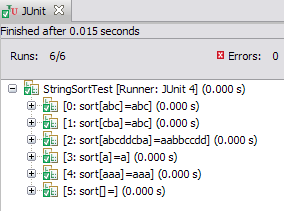
@ParameterizedTest(name = "{0} is sorted to {1}")
@MethodSource("dataProvider")
void testSort(final int[] input, final int[] expected) {
  Arrays.sort(input);
  assertArrayEquals(expected, input);
}

static Stream<Arguments> dataProvider() {
  return Stream.of(
      arguments(new int[] { 1, 2, 3 }, new int[] { 1, 2, 3 }),
      arguments(new int[] { 3, 2, 1 }, new int[] { 1, 2, 3 }),
      arguments(new int[] { 5, 5, 5 }, new int[] { 5, 5, 5 }));
}

For more information, see the JUnit 5 User Guide on Parameterized Tests.

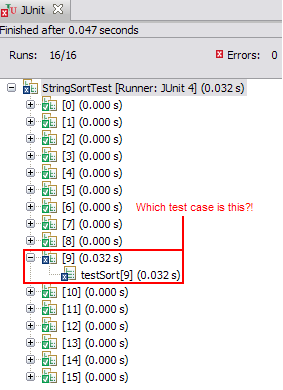
If you're still on JUnit 4 (why?!), check out my previous post on Parameterized Tests in JUnit 4.

Thursday, November 19, 2020

Testing Expected Exceptions with JUnit 5

This post shows how to test for expected exceptions using JUnit 5. If you're still on JUnit 4, please check out my previous post.

Let's start with the following class that we wish to test:

public class Person {
  private final String name;
  private final int age;
    
  /**
   * Creates a person with the specified name and age.
   *
   * @param name the name
   * @param age the age
   * @throws IllegalArgumentException if the age is not greater than zero
   */
  public Person(String name, int age) {
    this.name = name;
    this.age = age;
    if (age <= 0) {
      throw new IllegalArgumentException("Invalid age:" + age);
    }
  }
}

To test that an IllegalArgumentException is thrown if the age of the person is less than zero, you should use JUnit 5's assertThrows as shown below:

import static org.hamcrest.CoreMatchers.*;
import static org.hamcrest.MatcherAssert.*;
import static org.junit.jupiter.api.Assertions.*;

import org.junit.jupiter.api.Test;

class PersonTest {

  @Test
  void testExpectedException() {
    assertThrows(IllegalArgumentException.class, () -> {
      new Person("Joe", -1);
    });
  }

  @Test
  void testExpectedExceptionMessage() {
    final Exception e = assertThrows(IllegalArgumentException.class, () -> {
      new Person("Joe", -1);
    });
    assertThat(e.getMessage(), containsString("Invalid age"));
  }
}

Related post: Testing Expected Exceptions with JUnit 4 Rules

Monday, April 22, 2019

Load Testing Web Apps Using Apache JMeter

Apache JMeter is an excellent tool for simulating user load on a web application in order to test performance. You can easily build a test plan by specifying the number of users and the interval between requests, and JMeter will then spawn a thread per user and hit your webapp. At the end of the test, you will get a performance summary report showing the min, max and average response times.

Here is a quick walkthrough of using JMeter:

  • Download JMeter from here
  • Run the jmeter.bat (for Windows) or jmeter (for Unix) file to start the JMeter GUI
  • Add a "Thread Group" to the Test Plan and configure the number of users, ramp-up period and duration of the test
  • Add a "HTTP Request" to the Thread Group and set the server URL and any request parameters
  • Add a "Constant Timer" (or any other Timer) to the HTTP Request and specify the time interval between requests
  • Add a "Summary Report" to the Thread Group
  • Add a "View Results in Table" to the Thread Group
  • Run the test and view the Summary Report

There are a number of other components that can be added to the test plan as well. For example, you can add a "HTTP Header Manager" to the Thread Group if you want to add any fields to the request's header. The "Response Assertion" component is useful for checking if you have received the desired response from the server.

Once you are happy with your test plan, you can save it to a file and then run it on the command line whenever you need to load test your application or as part of your continuous build process.

Saturday, September 08, 2018

Java: Mocking a ResultSet using Mockito

This post shows how you can mock a java.sql.ResultSet using Mockito. It can be used to help unit test code which performs operations on ResultSets (such as a ResultSetExtractor) without relying on an external datasource.

You can create a MockResultSet by providing a list of column names and a 2D array of data. For example:

var rs = MockResultSet.create(
           new String[] { "name", "age" }, //columns
           new Object[][] { // data
             { "Alice", 20 },
             { "Bob", 35 },
             { "Charles", 50 }
           });

The code for MockResultSet is shown below (also available in my GitHub Repository). Note that I have only mocked a few methods such as next, getString and getObject but it is quite easy to mock the rest by following the same pattern.

public class MockResultSet {

  private final Map<String, Integer> columnIndices;
  private final Object[][] data;
  private int rowIndex;

  private MockResultSet(final String[] columnNames,
                        final Object[][] data) {
    // create a map of column name to column index
    this.columnIndices = IntStream.range(0, columnNames.length)
        .boxed()
        .collect(Collectors.toMap(
            k -> columnNames[k],
            Function.identity(),
            (a, b) ->
              { throw new RuntimeException("Duplicate column " + a); },
            LinkedHashMap::new
            ));
    this.data = data;
    this.rowIndex = -1;
  }

  private ResultSet buildMock() throws SQLException {
    final var rs = mock(ResultSet.class);

    // mock rs.next()
    doAnswer(invocation -> {
      rowIndex++;
      return rowIndex < data.length;
    }).when(rs).next();

    // mock rs.getString(columnName)
    doAnswer(invocation -> {
      final var columnName = invocation.getArgumentAt(0, String.class);
      final var columnIndex = columnIndices.get(columnName);
      return (String) data[rowIndex][columnIndex];
    }).when(rs).getString(anyString());

    // mock rs.getObject(columnIndex)
    doAnswer(invocation -> {
      final var index = invocation.getArgumentAt(0, Integer.class);
      return data[rowIndex][index - 1];
    }).when(rs).getObject(anyInt());

    final var rsmd = mock(ResultSetMetaData.class);

    // mock rsmd.getColumnCount()
    doReturn(columnIndices.size()).when(rsmd).getColumnCount();

    // mock rs.getMetaData()
    doReturn(rsmd).when(rs).getMetaData();

    return rs;
  }

  /**
   * Creates the mock ResultSet.
   *
   * @param columnNames the names of the columns
   * @param data
   * @return a mocked ResultSet
   * @throws SQLException
   */
  public static ResultSet create(
                         final String[] columnNames,
                         final Object[][] data)
                         throws SQLException {
    return new MockResultSet(columnNames, data).buildMock();
  }
}

Saturday, March 10, 2018

JUnit Hamcrest Matcher for JSON

This post shows how you can write JUnit tests to check if an object matches a JSON string. This is important if you are implementing REST services and want to test if your service produces the expected JSON response.

A useful library for comparing JSON objects is JSONassert. First, you have to convert your Java object into a JSON string (using Jackson, for example) and then compare it with your expected JSON string using JSONassert. (You could also convert your Java object into a JSONObject but I find that it's much easier to convert it into a string.)

The following snippet shows how you can compare an object (a List, in this case) against its JSON representation using JSONassert.

import org.skyscreamer.jsonassert.JSONAssert;
import com.fasterxml.jackson.databind.ObjectMapper;

List<String> fruits = Arrays.asList("apple", "banana");
String fruitsJSON = new ObjectMapper().writeValueAsString(fruits);
String expectedFruitsJSON = "[\"apple\", \"banana\"]";
JSONAssert.assertEquals(expectedFruitsJSON, fruitsJSON, true);

In order to make it simpler to write such unit tests, I have written a Hamcrest Matcher called IsEqualJSON for comparing JSON objects. It still uses JSONassert but allows you to express your tests in a more fluent way.

The following code shows how IsEqualJSON is used:

import static org.junit.Assert.*;
import static testutil.IsEqualJSON.*;

assertThat(Arrays.asList("apple", "banana"),
           equalToJSON("[\"apple\", \"banana\"]"));

// you can also have your expected JSON read from a file
assertThat(Arrays.asList("apple", "banana"),
           equalToJSONInFile("fruits.json"));

Here is the code for IsEqualJSON (also available in my GitHub Repository):

import java.io.IOException;
import java.nio.charset.StandardCharsets;
import java.nio.file.*;
import org.hamcrest.*;
import org.skyscreamer.jsonassert.*;
import com.fasterxml.jackson.core.JsonProcessingException;
import com.fasterxml.jackson.databind.ObjectMapper;

/**
 * A Matcher for comparing JSON.
 * Example usage:
 * <pre>
 * assertThat(new String[] {"foo", "bar"}, equalToJSON("[\"foo\", \"bar\"]"));
 * assertThat(new String[] {"foo", "bar"}, equalToJSONInFile("/tmp/foo.json"));
 * </pre>
 */
public class IsEqualJSON extends DiagnosingMatcher<Object> {

  private final String expectedJSON;
  private JSONCompareMode jsonCompareMode;

  public IsEqualJSON(final String expectedJSON) {
    this.expectedJSON = expectedJSON;
    this.jsonCompareMode = JSONCompareMode.STRICT;
  }

  @Override
  public void describeTo(final Description description) {
    description.appendText(expectedJSON);
  }

  @Override
  protected boolean matches(final Object actual,
                            final Description mismatchDescription) {
    final String actualJSON = toJSONString(actual);
    final JSONCompareResult result = JSONCompare.compareJSON(expectedJSON,
                                                             actualJSON,
                                                             jsonCompareMode);
    if (!result.passed()) {
      mismatchDescription.appendText(result.getMessage());
    }
    return result.passed();
  }

  private static String toJSONString(final Object o) {
    try {
      return o instanceof String ?
          (String) o : new ObjectMapper().writeValueAsString(o);
    } catch (final JsonProcessingException e) {
      throw new RuntimeException(e);
    }
  }

  private static String getFileContents(final Path path) {
    try {
      return new String(Files.readAllBytes(path), StandardCharsets.UTF_8);
    } catch (final IOException e) {
      throw new RuntimeException(e);
    }
  }

  @Factory
  public static IsEqualJSON equalToJSON(final String expectedJSON) {
    return new IsEqualJSON(expectedJSON);
  }

  @Factory
  public static IsEqualJSON equalToJSONInFile(final Path expectedPath) {
    return equalToJSON(getFileContents(expectedPath));
  }

  @Factory
  public static IsEqualJSON equalToJSONInFile(final String expectedFileName) {
    return equalToJSONInFile(Paths.get(expectedFileName));
  }
}

Sunday, March 31, 2013

JUnit: Creating Temporary Files using the TemporaryFolder @Rule

If you have an application that writes out files, how do you test that the generated file is correct?

One approach, is to configure the application to write out to some pre-defined temporary location such as /tmp (on *nix based systems) and then delete the files after the test. But this requires a lot of boilerplate code in your unit tests and can be error prone. Sometimes, developers forget to clean up these temporary files and leave a mess behind. I have also seen cases where unit tests have written temporary files to the current directory (which contains test code) and developers have accidently checked them into source control, which definitely shouldn't happen!

The right way to deal with temporary files in unit tests is by using JUnit's TemporaryFolder Rule. With it, you no longer need to worry about where to create your temporary files or deleting them after the test succeeds or fails. JUnit handles all of that for you.

The following example shows you how to use the TemporaryFolder Rule:

import static org.hamcrest.Matchers.is;
import static org.junit.Assert.assertThat;

import java.io.File;
import java.io.IOException;

import org.apache.commons.io.FileUtils;
import org.junit.Rule;
import org.junit.Test;
import org.junit.rules.TemporaryFolder;

public class MyTest {

  @Rule
  public TemporaryFolder tempFolder = new TemporaryFolder();

  @Test
  public void testWrite() throws IOException {
    // Create a temporary file.
    // This is guaranteed to be deleted after the test finishes.
    final File tempFile = tempFolder.newFile("myfile.txt");

    // Write something to it.
    FileUtils.writeStringToFile(tempFile, "hello world");

    // Read it.
    final String s = FileUtils.readFileToString(tempFile);

    // Check that what was written is correct.
    assertThat("hello world", is(s));
  }
}

JUnit: Naming Individual Test Cases in a Parameterized Test

A couple of years ago I wrote about JUnit Parameterized Tests. One of the things I didn't like about them was that JUnit named the invidividual test cases using numbers, so if they failed you had no idea which test parameters caused the failure. The following Eclipse screenshot will show you what I mean:

A parameterised test without names

However, in JUnit 4.11, the @Parameters annotation now takes a name argument which can be used to display the parameters in the test name and hence, make them more descriptive. You can use the following placeholders in this argument and they will be replaced by actual values at runtime by JUnit:

  • {index}: the current parameter index
  • {0}, {1}, ...: the first, second, and so on, parameter value
Here is an example:

import static org.junit.Assert.assertEquals;

import java.util.Arrays;
import java.util.Collection;

import org.junit.Test;
import org.junit.runner.RunWith;
import org.junit.runners.Parameterized;
import org.junit.runners.Parameterized.Parameters;

@RunWith(Parameterized.class)
public class StringSortTest {

  @Parameters(name = "{index}: sort[{0}]={1}")
  public static Collection<Object[]> data() {
    return Arrays.asList(new Object[][] {
          { "abc", "abc"},
          { "cba", "abc"},
          { "abcddcba", "aabbccdd"},
          { "a", "a"},
          { "aaa", "aaa"},
          { "", ""}
        });
  }

  private final String input;
  private final String expected;

  public StringSortTest(final String input, final String expected){
    this.input = input;
    this.expected = expected;
  }

  @Test
  public void testSort(){
    assertEquals(expected, sort(input));
  }

  private static String sort(final String s) {
    final char[] charArray = s.toCharArray();
    Arrays.sort(charArray);
    return new String(charArray);
  }
}
When you run the test, you will see individual test cases named as shown in the Eclipse screenshot below, so it is easy to identify the parameters used in each test case.

A parameterised test with individual test case naming

Note that due to a bug in Eclipse, names containing brackets are truncated. That's why I had to use sort[{0}], instead of sort({0}).

Sunday, October 07, 2012

Java: Find an Available Port Number

In some cases, such as in unit tests, you might need to start up a server or an rmiregistry. What port number do you use? You cannot hardcode the port number because when your unit test runs on a continuous build server or on a colleague's machine, it might already be in use. Instead, you need a way to find an available port on the current machine.

According to IANA (Internet Assigned Numbers Authority), the ports that we are free to use lie in the range 1024-49151:

Port numbers are assigned in various ways, based on three ranges: System Ports (0-1023), User Ports (1024-49151), and the Dynamic and/or Private Ports (49152-65535)
The following utility class can help find an available port on your local machine:
import java.io.IOException;
import java.net.DatagramSocket;
import java.net.ServerSocket;
 
/**
 * Finds an available port on localhost.
 */
public class PortFinder {
 
  // the ports below 1024 are system ports
  private static final int MIN_PORT_NUMBER = 1024;
 
  // the ports above 49151 are dynamic and/or private
  private static final int MAX_PORT_NUMBER = 49151;
 
  /**
   * Finds a free port between 
   * {@link #MIN_PORT_NUMBER} and {@link #MAX_PORT_NUMBER}.
   *
   * @return a free port
   * @throw RuntimeException if a port could not be found
   */
  public static int findFreePort() {
    for (int i = MIN_PORT_NUMBER; i <= MAX_PORT_NUMBER; i++) {
      if (available(i)) {
        return i;
      }
    }
    throw new RuntimeException("Could not find an available port between " + 
                               MIN_PORT_NUMBER + " and " + MAX_PORT_NUMBER);
  }
 
  /**
   * Returns true if the specified port is available on this host.
   *
   * @param port the port to check
   * @return true if the port is available, false otherwise
   */
  private static boolean available(final int port) {
    ServerSocket serverSocket = null;
    DatagramSocket dataSocket = null;
    try {
      serverSocket = new ServerSocket(port);
      serverSocket.setReuseAddress(true);
      dataSocket = new DatagramSocket(port);
      dataSocket.setReuseAddress(true);
      return true;
    } catch (final IOException e) {
      return false;
    } finally {
      if (dataSocket != null) {
        dataSocket.close();
      }
      if (serverSocket != null) {
        try {
          serverSocket.close();
        } catch (final IOException e) {
          // can never happen
        }
      }
    }
  }
}

Sunday, September 23, 2012

Spring 3 - JavaConfig: Unit Testing using a Different Profile

In unit tests, you should not connect to an external database or webservice. Instead, you should use an in-memory database like hsqldb and mock any other external system dependencies. In order to do so, you need to inject test beans into the Spring container instead of using real ones. This example shows how you can use a different configuration for unit testing using Spring Java-based configuration.

Let's start with the following configuration:

/**
 * Configuration for an external oracle database.
 */
@Configuration
public class DatabaseConfig {

  @Bean
  public DataSource personDataSource() {
    DataSource ds = new org.apache.commons.dbcp.BasicDataSource();
    ds.setDriverClassName("oracle.jdbc.driver.OracleDriver");
    ds.setUrl("jdbc:oracle:thin:@firefly:1521:HRP2");
    ds.setUsername("scott");
    ds.setPassword("tiger");
    return ds;
  }
}

/**
 * Main application config.
 */
@Configuration
@Import(DatabaseConfig.class)
public class AppConfig {

  @Bean
  public PersonDao personDao() {
    return new PersonDao(personDataSource());
  }
}
In order to use a different database for your unit tests, you need to create a separate unit test database configuration as shown below. This configuration returns an HSQL data source and, more importantly, is decorated with a @Profile annotation which indicates that it will be only be used when the "unit-test" profile is active.
/**
 * Configuration for an embedded HSQL database used by unit tests.
 */
@Configuration
@Profile("unit-test")
public class UnitTestDatabaseConfig extends DatabaseConfig {

  @Override
  @Bean
  public DataSource personDataSource() {
    return new EmbeddedDatabaseBuilder()
               .setType(EmbeddedDatabaseType.HSQL)
               .addScript("person.sql")
               .build();
  }
}
Now, write your unit test as shown below. The @ActiveProfiles annotation tells Spring which profile to use when loading beans for the test classes. Since it is set to "unit-test", the HSQL DataSource will be used.
@RunWith(SpringJUnit4ClassRunner.class)
@ContextConfiguration(classes = { AppConfig.class, UnitTestDatabaseConfig.class })
@ActiveProfiles("unit-test")
public class PersonDaoTest {

  @Autowired
  private PersonDao personDao;

  @Test
  public void testGetPerson() {
    Person p = personDao.getPerson("Joe");
  }
}

Sunday, March 25, 2012

Mocking with Mockito

Here is an example of using Mockito to mock a service. The service used in this example, is a fictitious PersonService which returns Person objects based on their name. It might do this by connecting to a external database. In our unit tests, we don't want to connect to an external database, hence the reason for creating a mock. The mocked version shown below always returns a new Person object with the name that was passed into the service.
import static org.mockito.Matchers.anyString;
import static org.mockito.Mockito.when;
import static org.junit.Assert.*;
import org.mockito.Mock;
import org.mockito.MockitoAnnotations;
import org.mockito.invocation.InvocationOnMock;
import org.mockito.stubbing.Answer;

public class PersonServiceTest {

  @Mock private PersonService personService;

  @Before
  public void setUp() {
    MockitoAnnotations.initMocks(this);
    when(personService.getPerson(anyString())).thenAnswer(
      new Answer<Person>() {
        @Override
        public Person answer(InvocationOnMock invocation) throws Throwable {
          Object[] args = invocation.getArguments();
          return new Person((String)args[0]);
        }
      });
  }

  @Test
  public void testGetPerson(){
    assertEquals("Alice", personService.getPerson("Alice").getName());
  }
}

Saturday, June 25, 2011

JUnit Theories

A Theory is slightly different from a parameterised test. A theory defines a "universal truth" which should hold in possibly infinite numbers of potential scenarios (as long as assumptions hold). For example, the statement, "if two objects are equal, then they must have the same hashcode", is a theory.

To set up a Theory in JUnit 4.4, you need to:

  • Annotate the test class with @RunWith(Theories.class)
  • Create test data using the @DataPoints or @DataPoint annotation
  • Write a method (the "theory") annotated with @Theory and accepting arguments of your data points
Example:
The example below shows a test for the Theory that if two objects are equal, they must have the same hashcode. You can define your data points in different ways as I've demonstrated below. When you run the test, the method testHashcodeEquals will be called with all possible permutations of your test data e.g. (foo,foo), (foo,bar), (foo,baz), (foo,1), (foo,2), (bar, bar), (bar, foo) etc.
import static org.hamcrest.core.Is.is;
import static org.junit.Assert.assertThat;
import static org.junit.Assume.assumeThat;

import org.junit.experimental.theories.DataPoint;
import org.junit.experimental.theories.DataPoints;
import org.junit.experimental.theories.Theories;
import org.junit.experimental.theories.Theory;
import org.junit.runner.RunWith;

@RunWith(Theories.class)
public class HashcodeEqualsTheory {

  @DataPoints
  public static String[] data = new String[]{"foo", "bar"};

  @DataPoint
  public static String baz = "baz";

  @DataPoints
  public static Integer[] getData(){
      return new Integer[] {1, 2};
  }

  /**
   * If two objects are equal, they must have the same hashcode
   * @param x
   * @param y
   */
  @Theory
  public void testHashcodeEquals(Object x, Object y){
      assumeThat(x.equals(y), is(true));
      assertThat(x.hashCode(), is(y.hashCode()));
  }
}
Related Posts:
Parameterized Tests in JUnit

Parameterized Tests in JUnit

A parameterised test allows you to run a test against a varying set of data. If you find yourself calling the same test but with different inputs, over and over again, a parameterised test would help make your code cleaner. To create one in JUnit you need to:
  • Annotate the test class with @RunWith(Parameterized.class)
  • Create a static method annotated with @Parameters which returns a collection of arrays. Each array in the collection represents the test data and will be injected into the constructor of the test class
  • Make sure that the test class constructor matches the array items in the Parameters method and stores the test data
  • Write some test methods annotated with @Test
Example:
The example below shows a parameterised test which tests array sorting. The data method returns a collection of arrays. Each array contains an input array and an expected output (sorted) array. When you run the test, the class is instantiated with each of these arrays and then the testSort method is called.
import static org.junit.Assert.assertArrayEquals;

import java.util.Arrays;
import java.util.Collection;

import org.junit.Test;
import org.junit.runner.RunWith;
import org.junit.runners.Parameterized;
import org.junit.runners.Parameterized.Parameters;

@RunWith(Parameterized.class)
public class ArraySortTest {

  @Parameters
  public static Collection<Object[]> data() {
      return Arrays.asList(new Object[][] {
         { new int[] { 1, 3, 2 }, new int[] { 1, 2, 3 } },
         { new int[] { 3, 2, 1 }, new int[] { 1, 2, 3 } },
         { new int[] { 1, 2, 3 }, new int[] { 1, 2, 3 } },
         { new int[] { 1, 1, 1 }, new int[] { 1, 1, 1 } },
         { new int[] { 1 }, new int[] { 1 } },
         { new int[] {}, new int[] {} },
         });
  }

  private final int[] actual;
  private final int[] expected;

  public ArraySortTest(int[] actual, int[] expected){
      this.actual = actual;
      this.expected = expected;
  }

  @Test
  public void testSort(){
      Arrays.sort(actual);
      assertArrayEquals(expected, actual);
  }
}
Documentation
Javadocs: Class Parameterized