Saturday, April 27, 2013

Adding Java System Properties from a Properties File

Apache Commons Configuration provides a very easy way to load a properties file into the system properties:
try {
  final PropertiesConfiguration propsConfig = new PropertiesConfiguration(
                                              Foo.class.getResource("foo.properties"));
  SystemConfiguration.setSystemProperties(propsConfig);
} catch (Exception e) {
  throw new RuntimeException("Failed to load config file: " + propsFile, e);
}
If you are unable to use this library, then you will have to use the longer, more tedious approach of loading the properties file, iterating over the properties and setting each one into the system properties. This is shown below:
final Properties props = new Properties();
final InputStream in = Foo.class.getResourceAsStream("foo.properties");
try {
  props.load(in);
  for (final Entry<Object, Object> entry : props.entrySet()) {
    System.setProperty(entry.getKey().toString(), entry.getValue().toString());
  }
} catch (IOException e) {
  throw new RuntimeException("Failed to load properties", e);
}
finally {
  try {
    in.close();
  } catch (IOException e) {
    // don't care
  }
}

Monday, April 01, 2013

Gracefully Shutting Down Spring Applications

To gracefully shutdown your spring (non-web) application, you should do two things:

1. Register a shutdown hook
Call registerShutdownHook() that is declared in the AbstractApplicationContext class in order to register a shutdown hook with the JVM. I wrote about Shutdown Hooks in a previous post. They allow your application to perform "clean up" when the JVM exits either naturally or with a kill/Ctrl+C signal. Spring's shutdown hook closes your application context and hence calls the relevant destroy methods on your beans so that all resources are released (provided that the destroy callbacks have been implemented correctly!). Also, note that no guarantee can be made about whether or not any shutdown hooks will be run if the JVM aborts with the SIGKILL signal (kill -9) on Unix or the TerminateProcess call on MS Windows.

2. Close the context in a finally block
You should also call close() on your application context in a finally block. This is because if your application throws an unhandled RuntimeException, you might have background threads, started by some beans, still running and your JVM will not terminate. That's why you need to explicitly close the application context.

Putting these two steps together, you get the following code:

public static void main(final String... args) {
  AbstractApplicationContext appContext = null;
  try {
    appContext = new AnnotationConfigApplicationContext("my.app.package");
    appContext.registerShutdownHook();
    final MyApp app = appContext.getBean(MyApp.class);
    app.doSomething();
  } catch (final Exception e) {
    // handle exceptions properly here
    e.printStackTrace();
  } finally {
    if (appContext != null) {
      ((AnnotationConfigApplicationContext) appContext).close();
    }
  }
}
Related Posts:
Shutting Down Java Apps [Howto]

Sunday, March 31, 2013

JUnit: Creating Temporary Files using the TemporaryFolder @Rule

If you have an application that writes out files, how do you test that the generated file is correct?

One approach, is to configure the application to write out to some pre-defined temporary location such as /tmp (on *nix based systems) and then delete the files after the test. But this requires a lot of boilerplate code in your unit tests and can be error prone. Sometimes, developers forget to clean up these temporary files and leave a mess behind. I have also seen cases where unit tests have written temporary files to the current directory (which contains test code) and developers have accidently checked them into source control, which definitely shouldn't happen!

The right way to deal with temporary files in unit tests is by using JUnit's TemporaryFolder Rule. With it, you no longer need to worry about where to create your temporary files or deleting them after the test succeeds or fails. JUnit handles all of that for you.

The following example shows you how to use the TemporaryFolder Rule:

import static org.hamcrest.Matchers.is;
import static org.junit.Assert.assertThat;

import java.io.File;
import java.io.IOException;

import org.apache.commons.io.FileUtils;
import org.junit.Rule;
import org.junit.Test;
import org.junit.rules.TemporaryFolder;

public class MyTest {

  @Rule
  public TemporaryFolder tempFolder = new TemporaryFolder();

  @Test
  public void testWrite() throws IOException {
    // Create a temporary file.
    // This is guaranteed to be deleted after the test finishes.
    final File tempFile = tempFolder.newFile("myfile.txt");

    // Write something to it.
    FileUtils.writeStringToFile(tempFile, "hello world");

    // Read it.
    final String s = FileUtils.readFileToString(tempFile);

    // Check that what was written is correct.
    assertThat("hello world", is(s));
  }
}

JUnit: Naming Individual Test Cases in a Parameterized Test

A couple of years ago I wrote about JUnit Parameterized Tests. One of the things I didn't like about them was that JUnit named the invidividual test cases using numbers, so if they failed you had no idea which test parameters caused the failure. The following Eclipse screenshot will show you what I mean:
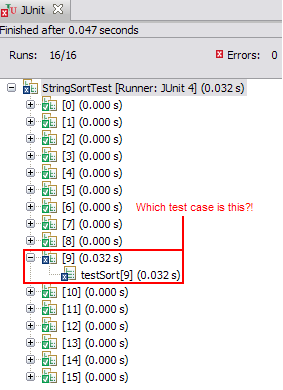
A parameterised test without names

However, in JUnit 4.11, the @Parameters annotation now takes a name argument which can be used to display the parameters in the test name and hence, make them more descriptive. You can use the following placeholders in this argument and they will be replaced by actual values at runtime by JUnit:

  • {index}: the current parameter index
  • {0}, {1}, ...: the first, second, and so on, parameter value
Here is an example:

import static org.junit.Assert.assertEquals;

import java.util.Arrays;
import java.util.Collection;

import org.junit.Test;
import org.junit.runner.RunWith;
import org.junit.runners.Parameterized;
import org.junit.runners.Parameterized.Parameters;

@RunWith(Parameterized.class)
public class StringSortTest {

  @Parameters(name = "{index}: sort[{0}]={1}")
  public static Collection<Object[]> data() {
    return Arrays.asList(new Object[][] {
          { "abc", "abc"},
          { "cba", "abc"},
          { "abcddcba", "aabbccdd"},
          { "a", "a"},
          { "aaa", "aaa"},
          { "", ""}
        });
  }

  private final String input;
  private final String expected;

  public StringSortTest(final String input, final String expected){
    this.input = input;
    this.expected = expected;
  }

  @Test
  public void testSort(){
    assertEquals(expected, sort(input));
  }

  private static String sort(final String s) {
    final char[] charArray = s.toCharArray();
    Arrays.sort(charArray);
    return new String(charArray);
  }
}
When you run the test, you will see individual test cases named as shown in the Eclipse screenshot below, so it is easy to identify the parameters used in each test case.
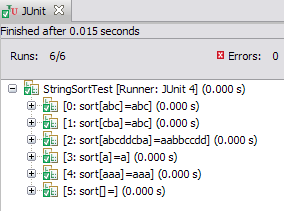
A parameterised test with individual test case naming

Note that due to a bug in Eclipse, names containing brackets are truncated. That's why I had to use sort[{0}], instead of sort({0}).

Saturday, March 23, 2013

JAXB MarshalException: Missing an @XmlRootElement Annotation

When marshalling JAXB objects you might get an exception about a missing @XmlRootElement annotation. For example:
javax.xml.bind.MarshalException - with linked exception: 
[com.sun.istack.SAXException2: unable to marshal type "FooType"
as an element because it is missing an @XmlRootElement annotation]
In order to resolve this issue, use the simple binding mode to generate your JAXB classes.

Create the following binding file:

<jaxb:bindings jaxb:extensionBindingPrefixes="xjc" version="2.1"
  xmlns:jaxb="http://java.sun.com/xml/ns/jaxb"
  xmlns:xjc="http://java.sun.com/xml/ns/jaxb/xjc">
  <jaxb:globalBindings>
    <xjc:simple/>
  </jaxb:globalBindings>
</jaxb:bindings>
Pass this file to xjc or wsdl2java using the -b option.

You should now see @XmlRootElement annotations on your classes.