Saturday, December 21, 2013

stackoverflow - 70k rep

Five months after crossing the 60k milestone, I have now reached a reputation of 70k on stackoverflow!

The following table shows some stats about my journey so far:

0-10k 10-20k 20-30k 30-40k 40-50k 50-60k 60-70k Total
Date achieved 01/2011 05/2011 01/2012 09/2012 02/2013 07/2013 12/2013
Questions answered 546 376 253 139 192 145 66 1717
Questions asked 46 1 6 0 1 0 0 54
Tags covered 609 202 83 10 42 14 11 971
Badges
(gold, silver, bronze)
35
(2, 10, 23)
14
(0, 4, 10)
33
(2, 8, 23)
59
(3, 20, 36)
49
(0, 19, 30)
65
(2, 26, 37)
60
(5, 22, 33)
315
(14, 109, 192)

I have been very busy over the last few months and haven't had much time to go on stackoverflow. As you can see, I only answered 66 questions over the last 5 months, but my previous answers have helped keep my reputation ticking along nicely. For me, stackoverflow has not simply been a quest for reputation, but more about learning new technologies and picking up advice from other people on the site. I like to take on challenging questions, rather than the easy ones, because it pushes me to do research into areas I have never looked at before, and I learn so much during the process.

Next stop, 80k!

Saturday, November 09, 2013

Throttling Task Submission with a BlockingExecutor

The JDK's java.util.concurrent.ThreadPoolExecutor allows you to submit tasks to a thread pool and uses a BlockingQueue to hold submitted tasks. If you have thousands of tasks to submit, you specify a "bounded" queue (i.e. one with a maximum capacity) otherwise your JVM may run out of memory. You can set a RejectedExecutionHandler to handle what happens when the queue is full, but there are still outstanding tasks to submit.

Here is a simple example showing how you would use a ThreadPoolExecutor with a BlockingQueue with capacity 1000. The CallerRunsPolicy ensures that, when the queue is full, additional tasks will be processed by the submitting thread.

int numThreads = 5;
ExecutorService exec = new ThreadPoolExecutor(5, 5, 0L, TimeUnit.MILLISECONDS,
                                 new ArrayBlockingQueue<Runnable>(1000),
                                 new ThreadPoolExecutor.CallerRunsPolicy());

The problem with this approach is that, when the queue is full, the thread submitting the tasks to the pool becomes busy executing a task itself and during this time, the queue could become empty and the threads in the pool could become idle. This is not very efficient. We want to keep the thread pool busy and the work queue saturated at all the times.

There are various solutions to this problem. One of them is to use a custom Executor which blocks (and thus prevents further tasks from being submitted to the pool) when the queue is full. The code for BlockingExecutor is shown below. It is based on the BoundedExecutor example from Brian Goetz, 2006. Java Concurrency in Practice. 1 Edition. Addison-Wesley Professional. (Section 8.3.3).

import java.util.concurrent.LinkedBlockingQueue;
import java.util.concurrent.RejectedExecutionException;
import java.util.concurrent.Semaphore;
import java.util.concurrent.ThreadPoolExecutor;
import java.util.concurrent.TimeUnit;

import org.slf4j.Logger;
import org.slf4j.LoggerFactory;

/**
 * An executor which blocks and prevents further tasks from
 * being submitted to the pool when the queue is full.
 * <p>
 * Based on the BoundedExecutor example in:
 * Brian Goetz, 2006. Java Concurrency in Practice. (Listing 8.4)
 */
public class BlockingExecutor extends ThreadPoolExecutor {

  private static final Logger LOGGER = LoggerFactory.
                                          getLogger(BlockingExecutor.class);
  private final Semaphore semaphore;

  /**
   * Creates a BlockingExecutor which will block and prevent further
   * submission to the pool when the specified queue size has been reached.
   *
   * @param poolSize the number of the threads in the pool
   * @param queueSize the size of the queue
   */
  public BlockingExecutor(final int poolSize, final int queueSize) {
    super(poolSize, poolSize, 0L, TimeUnit.MILLISECONDS,
          new LinkedBlockingQueue<Runnable>());

    // the semaphore is bounding both the number of tasks currently executing
    // and those queued up
    semaphore = new Semaphore(poolSize + queueSize);
  }

  /**
   * Executes the given task.
   * This method will block when the semaphore has no permits
   * i.e. when the queue has reached its capacity.
   */
  @Override
  public void execute(final Runnable task) {
    boolean acquired = false;
    do {
        try {
            semaphore.acquire();
            acquired = true;
        } catch (final InterruptedException e) {
            LOGGER.warn("InterruptedException whilst aquiring semaphore", e);
        }
    } while (!acquired);

    try {
        super.execute(task);
    } catch (final RejectedExecutionException e) {
        semaphore.release();
        throw e;
    }
  }

  /**
   * Method invoked upon completion of execution of the given Runnable,
   * by the thread that executed the task.
   * Releases a semaphore permit.
   */
  @Override
  protected void afterExecute(final Runnable r, final Throwable t) {
    super.afterExecute(r, t);
    semaphore.release();
  }
}

Sunday, October 20, 2013

Shell Scripting - Best Practices

Most programming languages have a set of "best practices" that should be followed when writing code in that language. However, I have not been able to find a comprehensive one for shell scripting so have decided to write my own based on my experience writing shell scripts over the years.

A note on portability: Since I mainly write shell scripts to run on systems which have Bash 4.2 installed, I don't need to worry about portability much, but you might need to! The list below is written with Bash 4.2 (and other modern shells) in mind. If you are writing a portable script, some points will not apply. Needless to say, you should perform sufficient testing after making any changes based on this list :-)

Here is my list of best practices for shell scripting (in no particular order):

  1. Use functions
  2. Document your functions
  3. Use shift to read function arguments
  4. Declare your variables
  5. Quote all parameter expansions
  6. Use arrays where appropriate
  7. Use "$@" to refer to all arguments
  8. Use uppercase variable names for environment variables only
  9. Prefer shell builtins over external programs
  10. Avoid unnecessary pipelines
  11. Avoid parsing ls
  12. Use globbing
  13. Use null delimited output where possible
  14. Don't use backticks
  15. Use process substitution instead of creating temporary files
  16. Use mktemp if you have to create temporary files
  17. Use [[ and (( for test conditions
  18. Use commands in test conditions instead of exit status
  19. Use set -e
  20. Write error messages to stderr

Each one of the points above is described in some detail below.

  1. Use functions

    Unless you're writing a very small script, use functions to modularise your code and make it more readable, reusable and maintainable. The template I use for all my scripts is shown below. As you can see, all code is written inside functions. The script starts off with a call to the main function.

    #!/bin/bash
    set -e
    
    usage() {
    }
    
    my_function() {
    }
    
    main() {
    }
    
    main "$@"
    
  2. Document your functions

    Add sufficient documentation to your functions to specify what they do and what arguments are required to invoke them. Here is an example:

    # Processes a file.
    # $1 - the name of the input file
    # $2 - the name of the output file
    process_file(){
    }
    
  3. Use shift to read function arguments

    Instead of using $1, $2 etc to pick up function arguments, use shift as shown below. This makes it easier to reorder arguments, if you change your mind later.

    # Processes a file.
    # $1 - the name of the input file
    # $2 - the name of the output file
    process_file(){
        local -r input_file="$1";  shift
        local -r output_file="$1"; shift
    }
    
  4. Declare your variables

    If your variable is an integer, declare it as such. Also, make all your variables readonly unless you intend to change their value later in your script. Use local for variables declared within functions. This helps convey your intent. If portability is a concern, use typeset instead of declare. Here are a few examples:

    declare -r -i port_number=8080
    declare -r -a my_array=( apple orange )
    
    my_function() {
        local -r name=apple
    }
    
  5. Quote all parameter expansions

    To prevent word-splitting and file globbing you must quote all variable expansions. In particular, you must do this if you are dealing with filenames that may contain whitespace (or other special characters). Consider this example:

    # create a file containing a space in its name
    touch "foo bar"
    
    declare -r my_file="foo bar"
    
    # try rm-ing the file without quoting the variable
    rm  $my_file
    # it fails because rm sees two arguments: "foo" and "bar"
    # rm: cannot remove `foo': No such file or directory
    # rm: cannot remove `bar': No such file or directory
    
    # need to quote the variable
    rm "$my_file"
    
    # file globbing example:
    mesg="my pattern is *.txt"
    echo $mesg
    # this is not quoted so *.txt will undergo expansion
    # will print "my pattern is foo.txt bar.txt"
    
    # need to quote it for correct output
    echo "$msg"


    It's good practice to quote all your variables. If you do need word-splitting, consider using an array instead. See the next point.

  6. Use arrays where appropriate

    Don't store a collection of elements in a string. Use an array instead. For example:

    # using a string to hold a collection
    declare -r hosts="host1 host2 host3"
    for host in $hosts  # not quoting $hosts here, since we want word splitting
    do
        echo "$host"
    done
    
    # use an array instead!
    declare -r -a host_array=( host1 host2 host3 )
    for host in "${host_array[@]}"
    do
        echo "$host"
    done
    
  7. Use "$@" to refer to all arguments

    Don't use $*. Refer to my previous post: Difference between $*, $@, "$*" and "$@". Here is an example:

    main() {
        # print each argument
        for i in "$@"
        do
            echo "$i"
        done
    }
    # pass all arguments to main
    main "$@"
    
  8. Use uppercase variable names for ENVIRONMENT variables only

    My personal preference is that all variables should be lowercase, except for environment variables. For example:

    declare -i port_number=8080
    
    # JAVA_HOME and CLASSPATH are environment variables
    "$JAVA_HOME"/bin/java -cp "$CLASSPATH" app.Main "$port_number"
    
  9. Prefer shell builtins over external programs

    The shell has the ability to manipulate strings and perform simple arithmetic so you don't need to invoke programs like cut and sed. Here are a few examples:

    declare -r my_file="/var/tmp/blah"
    
    # instead of dirname, use:
    declare -r file_dir="{my_file%/*}"
    
    # instead of basename, use:
    declare -r file_base="{my_file##*/}"
    
    # instead of sed 's/blah/hello', use:
    declare -r new_file="${my_file/blah/hello}"
    
    # instead of bc <<< "2+2", use:
    echo $(( 2+2 ))
    
    # instead of grepping a pattern in a string, use:
    [[ $line =~ .*blah$ ]]
    
    # instead of cut -d:, use an array:
    IFS=: read -a arr <<< "one:two:three"
    

    Note that an external program will perform better when operating on large files/input.

  10. Avoid unnecessary pipelines

    Pipelines add extra overhead to your script so try to keep your pipelines small. Common examples of useless pipelines are cat and echo, shown below:

    1. Avoid unnecessary cat

      If you are not familiar with the infamous Useless Use of Cat award, take a look here. The cat command should only be used for concatenating files, not for sending the output of a file to another command.

      # instead of
      cat file | command
      # use
      command < file
      
    2. Avoid unnecessary echo

      You should only use echo if you want to output some text to stdout, stderr, file etc. If you want to send text to another command, don't echo it through a pipe! Use a here-string instead. Note that here-strings are not portable (but most modern shells support them) so use a heredoc if you are writing a portable script. (See my earlier post: Useless Use of Echo.)

      # instead of
      echo text | command
      # use
      command <<< text
      
      # for portability, use a heredoc
      command << END
      text
      END
      
    3. Avoid unnecessary grep

      Piping from grep to awk or sed is unnecessary. Since both awk and sed can grep, you don't need the grep in your pipeline. (Check out my previous post: Useless Use of Grep.)

      # instead of
      grep pattern file | awk '{print $1}'
      # use
      awk '/pattern/{print $1}' file
      
      # instead of
      grep pattern file | sed 's/foo/bar/g'
      # use
      sed -n '/pattern/{s/foo/bar/p}' file
      
    4. Other unnecessary pipelines

      Here are a few other examples:

      # instead of
      command | sort | uniq
      # use
      command | sort -u
      
      # instead of
      command | grep pattern | wc -l
      # use
      command | grep -c pattern
      
  11. Avoid parsing ls

    The problem is that ls outputs filenames separated by newlines, so if you have a filename containing a newline character you won't be able to parse it correctly. It would be nice if ls could output null delimited filenames but, unfortunately, it can't. Instead of ls, use file globbing or an alternative command which outputs null terminated filenames, such as find -print0.

  12. Use globbing

    Globbing (or filename expansion) is the shell's way of generating a list of files matching a pattern. In bash, you can make globbing more powerful by enabling extended pattern matching operators using the extglob shell option. Also, enable nullglob so that you get an empty list if no matches are found. Globbing can be used instead of find in some cases and, once again, don't parse ls! Here are a couple of examples:

    
    shopt -s nullglob
    shopt -s extglob
    
    # get all files with a .yyyymmdd.txt suffix
    declare -a dated_files=( *.[0-9][0-9][0-9][0-9][0-9][0-9][0-9][0-9].txt )
    
    # get all non-zip files
    declare -a non_zip_files=( !(*.zip) )
    
    
  13. Use null delimited output where possible

    In order to correctly handle filenames containing whitespace and newline characters, you should use null delimited output, which results in each line being terminated by a NUL (\000) character instead of a newline. Most programs support this. For example, find -print0 outputs filenames followed by a null character and xargs -0 reads arguments separated by null characters.

    # instead of
    find . -type f -mtime +5 | xargs rm -f
    # use
    find . -type f -mtime +5 -print0 | xargs -0 rm -f
    
    # looping over files
    find . -type f -print0 | while IFS= read -r -d $'\0' filename; do
        echo "$filename"
    done
    
  14. Don't use backticks

    Use $(command) instead of `command` because it is easier to nest multiple commands and makes your code more readable. Here is a simple example:

    # ugly escaping required when using nested backticks
    a=`command1 \`command2\``
    
    # $(...) is cleaner
    b=$(command1 $(command2))
    
  15. Use process substitution instead of creating temporary files

    In most cases, if a command takes a file as an input, the file can be replaced by the output of another command using process substitution: <(command). This saves you from having to write out a temp file, passing that temp file to the command and finally deleting the temp file. This is shown below:

    # using temp files
    command1 > file1
    command2 > file2
    diff file1 file2
    rm file1 file2
    
    # using process substitution
    diff <(command1) <(command2)
    
  16. Use mktemp if you have to create temporary files

    Try to avoid creating temporary files. If you must, use mktemp to create a temporary directory and then write your files to it. Make sure you remove the directory after you are done.

    # set up a trap to delete the temp dir when the script exits
    unset temp_dir
    trap '[[ -d "$temp_dir" ]] && rm -rf "$temp_dir"' EXIT
    
    # create the temp dir
    declare -r temp_dir=$(mktemp -dt myapp.XXXXXX)
    
    # write to the temp dir
    command > "$temp_dir"/foo
    
  17. Use [[ and (( for test conditions

    Prefer [[ ... ]] over [ ... ] because it is safer and provides a richer set of features. Use (( ... )) for arithmetic conditions because it allows you to perform comparisons using familiar mathematical operators such as < and > instead of -lt and -gt. Note that if you desire portability, you have to stick to the old-fashioned [ ... ]. Here are a few examples:

    [[ $foo == "foo" ]] && echo "match"  # don't need to quote variable inside [[
    [[ $foo == "a" && $bar == "a" ]] && echo "match"
    
    declare -i num=5
    (( num < 10 )) && echo "match"       # don't need the $ on $num in ((
    
  18. Use commands in test conditions instead of exit status

    If you want to check whether a command succeeded before doing something, use the command directly in the condition of your if-statement instead of checking the command's exit status.

    
    # don't use exit status
    grep -q pattern file
    if (( $? == 0 ))
    then
        echo "pattern was found"
    fi
    
    # use the command as the condition
    if grep -q pattern file
    then
        echo "pattern was found"
    fi
    
  19. Use set -e

    Put this at the top of your script. This tells the shell to exit the script as soon as any statement returns a non-zero exit code.

  20. Write error messages to stderr

    Error messages belong on stderr not stdout.

    echo "An error message" >&2
    

If you have any other suggestions for my list, please share them in the comments section below!

Saturday, September 28, 2013

Guava 15 - New features

A new version of the Guava library was released earlier this month and contains several new features and improvements.

Here is an overview of some of the significant API additions in this release:

1. Escapers
Escapers allow you to "escape" special characters in a string in order to make the string conform to a particular format. For example, in XML, the < character must be converted into &lt; for inclusion in XML elements. Guava provides the following Escapers:

You can also build your own Escaper. Here is an example of various Escapers in action:
// escaping HTML
HtmlEscapers.htmlEscaper().escape("echo foo > file &");
// [result] echo foo &gt; file &amp;

// escaping XML attributes and content
XmlEscapers.xmlAttributeEscaper().escape("foo \"bar\"");
// [result] foo &quot;bar&quot;

XmlEscapers.xmlContentEscaper().escape("foo \"bar\"");
// [result] foo "bar"

// Custom Escaper
// escape single quote with another single quote
// and escape ampersand with backslash
Escaper myEscaper = Escapers.builder()
                            .addEscape('\'', "''")
                            .addEscape('&', "\&")
                            .build();

2. StandardSystemProperty
StandardSystemProperty is an enum of Java system properties such as java.version, java.home etc. The great thing about this is that you no longer need to remember what the system properties are called because you simply use the enum! Here is an example:

StandardSystemProperty.JAVA_VERSION.value();
// [result] 1.7.0_25

StandardSystemProperty.JAVA_VERSION.key();
// [result] java.version

3. EvictingQueue
The EvictingQueue is a non-blocking queue which removes elements from the head of the queue when it is full and you attempt to insert a new element. Example:

// create an EvictingQueue with a size of 3
EvictingQueue<String> q = EvictingQueue.create(3);
q.add("one");
q.add("two");
q.add("three");
q.add("four");
// the head of the queue is evicted after adding the fourth element
// queue contains: [two, three, four]

4. fileTreeTraverser
As its name suggests, Files.fileTreeTraverser allows you to traverse a file tree.

FluentIterable<File> iterable = Files.fileTreeTraverser().breadthFirstTraversal(new File("/var/tmp"));
for (File f : iterable) {
    System.out.println(f.getAbsolutePath());
}

(Note: Java 7's Files.walkFileTree also traverses a file tree and I showed you to use it in one of my earlier posts: Java 7: Deleting a Directory by Walking the File Tree. I'd recommend this approach if you are using Java 7.)

The full release notes of Guava 15 can be found here.

Sunday, August 25, 2013

Executing a Shell Command with a Timeout

Sometimes you may want to kill a command if it has been running for more than a specific time limit. For example, a shell script connecting to a network resource may hang for a long period of time if the resource is unavailable and it would be desirable to kill it and send out an alert.

This post describes different ways of running commands with time limits.

1) GNU coreutils timeout command
The easiest way to run a command with a time limit is by using the timeout command from GNU coreutils. For example, to run a command with a timeout of 2 minutes:

$ timeout 2m /path/to/command with args
$ echo $?
124
If the command has not completed within the specified time limit, the timeout utility will kill it (by sending it a TERM signal) and then exit with status 124.

2) The expect command
Another way to run a command with a timeout is by using expect as shown below:

$ expect -c "
    set echo '-noecho';
    set timeout 10;
    spawn -noecho /path/to/command with args;
    expect timeout { exit 124 } eof { exit 0 }"
$ echo $?
124
In the example above, the timeout is set to 10 seconds and expect will exit with a status of 124 when the command exceeds this time limit. Otherwise, it will exit with a status of 0. Unfortunately, you lose the exit code of the command you are running.

3) Using a custom timeout script
If you cannot use the two approaches above, you can write your own timeout script. Mine is shown below. It first starts a "watchdog" process which keeps checking to see if the command is running by executing kill -0 periodically. If it is still running after the time limit has been exceeded, the watchdog kills it.

#!/bin/bash
while getopts "t:" opt; do
  case "$opt" in
      t) timeout=$OPTARG ;;
  esac
done
shift $((OPTIND-1))

start_watchdog(){
  timeout="$1"
  (( i = timeout ))
  while (( i > 0 ))
  do
    kill -0 $$ || exit 0
    sleep 1
    (( i -= 1 ))
  done

  echo "killing process after timeout of $timeout seconds"
  kill $$
}

start_watchdog "$timeout" 2>/dev/null &
exec "$@"
Example:
$ timeout.sh -t 2 sleep 5
killing process after timeout of 2 seconds
Terminated

Saturday, July 20, 2013

stackoverflow - 60k rep

Last week I crossed the 50k milestone and have now reached a reputation of 60k on stackoverflow!

The following table shows some stats about my journey so far:

0-10k 10-20k 20-30k 30-40k 40-50k 50-60k Total
Date achieved 01/2011 05/2011 01/2012 09/2012 02/2013 07/2013
Questions answered 546 376 253 139 192 145 1651
Questions asked 46 1 6 0 1 0 54
Tags covered 609 202 83 10 42 14 960
Badges
(gold, silver, bronze)
35
(2, 10, 23)
14
(0, 4, 10)
33
(2, 8, 23)
59
(3, 20, 36)
49
(0, 19, 30)
65
(2, 26, 37)
255
(9, 87, 159)
I have really enjoyed being a member of stackoverflow. For me, it has not simply been a quest for reputation, but more about learning new technologies and picking up advice from other people on the site. I like to take on challenging questions, rather than the easy ones, because it pushes me to do research into areas I have never looked at before, and I learn so much during the process.

70k, here I come!

Saturday, June 29, 2013

Java 7 Swing: Creating Translucent and Shaped Windows

Java 7 Swing supports windows with transparency and non-rectangular shapes.

The following screenshot shows a circular window created with 75% opacity.

You can create a translucent window by altering its opacity using the setOpacity method on a JFrame. Note that you can only create translucent windows if the underlying operating system supports them. Also, ensure that the window is undecorated by calling setUndecorated(true).

To change the shape of the window, call the setShape method inside the componentResized method, so that if the window is resized, the shape is recalculated as well.

Sample code to create a translucent, circular window is shown below:

import java.awt.Color;
import java.awt.GraphicsDevice;
import java.awt.GraphicsEnvironment;
import java.awt.GridBagLayout;
import java.awt.event.ComponentAdapter;
import java.awt.event.ComponentEvent;
import java.awt.geom.Ellipse2D;

import javax.swing.JFrame;
import javax.swing.JTextArea;
import javax.swing.SwingUtilities;

public class TranslucentCircularFrame extends JFrame {

  /**
   * Creates a frame containing a text area and a button. The frame has a
   * circular shape and a 75% opacity.
   */
  public TranslucentCircularFrame() {
    super("Translucent Circular Frame");
    setLayout(new GridBagLayout());
    final JTextArea textArea = new JTextArea(3, 50);
    textArea.setBackground(Color.GREEN);
    add(textArea);
    setUndecorated(true);

    // set the window's shape in the componentResized method, so
    // that if the window is resized, the shape will be recalculated
    addComponentListener(new ComponentAdapter() {
      @Override
      public void componentResized(ComponentEvent e) {
        setShape(new Ellipse2D.Double(0, 0, getWidth(), getHeight()));
      }
    });

    // make the window translucent
    setOpacity(0.75f);

    setLocationRelativeTo(null);
    setSize(250, 250);
    setDefaultCloseOperation(EXIT_ON_CLOSE);
    setVisible(true);
  }

  public static void main(String[] args) {

    // Create the GUI on the event-dispatching thread
    SwingUtilities.invokeLater(new Runnable() {
      @Override
      public void run() {
        GraphicsEnvironment ge = GraphicsEnvironment
            .getLocalGraphicsEnvironment();

        // check if the OS supports translucency
        if (ge.getDefaultScreenDevice().isWindowTranslucencySupported(
            GraphicsDevice.WindowTranslucency.TRANSLUCENT)) {
          new TranslucentCircularFrame();
        }
      }
    });
  }
}

Sunday, May 26, 2013

Guava Joiner: Converting an Iterable into a String

Guava's Joiner makes it really easy to convert an Iterable into a String, so you no longer have to iterate over it and build the String manually. Here is an example:
// joining a list
final List<String> fruits = Lists.newArrayList("apple", "banana", null, "cherry");
System.out.println(Joiner.on(", ").skipNulls().join(fruits));

// joining a map
final Map<String, Integer> people = ImmutableMap.of("Alice", 21, "Bob", 19);
System.out.println(Joiner.on("\n").withKeyValueSeparator(": ").join(people));
prints:
apple, banana, cherry
Alice: 21
Bob: 19

Saturday, May 25, 2013

JAXB: Marshalling/Unmarshalling Example

This post shows how you can marshal a JAXB object into XML and unmarshal XML into a JAXB object.

Consider the following JAXB class:

import javax.xml.bind.annotation.*;

@XmlRootElement
public class Book {

  @XmlElement
  private String author;

  @XmlElement
  private String title;
}
Unmarshalling:
To convert an XML string into an object of class Book:
public static Book unmarshal(final String xml) throws JAXBException {
  return (Book) JAXBContext.newInstance(Book.class)
                           .createUnmarshaller()
                           .unmarshal(new StringReader(xml));
}
Marshalling:
To convert a Book object into an XML string:
public static String marshal(Book book) throws JAXBException {
  final Marshaller m = JAXBContext.newInstance(Book.class)
                                  .createMarshaller();
  m.setProperty(Marshaller.JAXB_FORMATTED_OUTPUT, true);
  final StringWriter w = new StringWriter();
  m.marshal(book, w);
  return w.toString();
}

Sunday, April 28, 2013

Useless Use of Grep

Most of us are familiar with the infamous Useless Use of Cat Award which is awarded for unnecessary use of the cat command. A while back, I also wrote about Useless Use of Echo in which I advised using here-strings and here-docs instead of the echo command. In a similar vein, this post is about the useless use of the grep command.

Useless use of grep | awk
awk can match patterns, so there is no need to pipe the output of grep to awk. For example, the following:

grep pattern file | awk '{commands}'
can be re-written as:
awk '/pattern/{commands}' file
Similarly:
grep -v pattern file | awk '{commands}'
can be re-written as:
awk '!/pattern/{commands}' file

Useless use of grep | sed
sed can match patterns, so you don't need to pipe the output of grep to sed. For example, the following:

grep pattern file | sed 's/foo/bar/g'
can be re-written as:
sed -n '/pattern/{s/foo/bar/p}' file
Similarly:
grep -v pattern file | sed 's/foo/bar/g'
can be re-written as:
sed -n '/pattern/!{s/foo/bar/p}' file

Useless use of grep in conditions
If you find yourself using grep in conditional statements to check if a string variable matches a certain pattern, consider using bash's in-built string matching instead. For example, the following:

if grep -q pattern <<< "$var"; then
    # do something
fi
can be re-written as:
if [[ $var == *pattern* ]]; then
    # do something
fi
or, if your pattern is a regex, rather than a fixed string, use:
if [[ $var =~ pattern ]]; then
    # do something
fi

Saturday, April 27, 2013

Adding Java System Properties from a Properties File

Apache Commons Configuration provides a very easy way to load a properties file into the system properties:
try {
  final PropertiesConfiguration propsConfig = new PropertiesConfiguration(
                                              Foo.class.getResource("foo.properties"));
  SystemConfiguration.setSystemProperties(propsConfig);
} catch (Exception e) {
  throw new RuntimeException("Failed to load config file: " + propsFile, e);
}
If you are unable to use this library, then you will have to use the longer, more tedious approach of loading the properties file, iterating over the properties and setting each one into the system properties. This is shown below:
final Properties props = new Properties();
final InputStream in = Foo.class.getResourceAsStream("foo.properties");
try {
  props.load(in);
  for (final Entry<Object, Object> entry : props.entrySet()) {
    System.setProperty(entry.getKey().toString(), entry.getValue().toString());
  }
} catch (IOException e) {
  throw new RuntimeException("Failed to load properties", e);
}
finally {
  try {
    in.close();
  } catch (IOException e) {
    // don't care
  }
}

Monday, April 01, 2013

Gracefully Shutting Down Spring Applications

To gracefully shutdown your spring (non-web) application, you should do two things:

1. Register a shutdown hook
Call registerShutdownHook() that is declared in the AbstractApplicationContext class in order to register a shutdown hook with the JVM. I wrote about Shutdown Hooks in a previous post. They allow your application to perform "clean up" when the JVM exits either naturally or with a kill/Ctrl+C signal. Spring's shutdown hook closes your application context and hence calls the relevant destroy methods on your beans so that all resources are released (provided that the destroy callbacks have been implemented correctly!). Also, note that no guarantee can be made about whether or not any shutdown hooks will be run if the JVM aborts with the SIGKILL signal (kill -9) on Unix or the TerminateProcess call on MS Windows.

2. Close the context in a finally block
You should also call close() on your application context in a finally block. This is because if your application throws an unhandled RuntimeException, you might have background threads, started by some beans, still running and your JVM will not terminate. That's why you need to explicitly close the application context.

Putting these two steps together, you get the following code:

public static void main(final String... args) {
  AbstractApplicationContext appContext = null;
  try {
    appContext = new AnnotationConfigApplicationContext("my.app.package");
    appContext.registerShutdownHook();
    final MyApp app = appContext.getBean(MyApp.class);
    app.doSomething();
  } catch (final Exception e) {
    // handle exceptions properly here
    e.printStackTrace();
  } finally {
    if (appContext != null) {
      ((AnnotationConfigApplicationContext) appContext).close();
    }
  }
}
Related Posts:
Shutting Down Java Apps [Howto]

Sunday, March 31, 2013

JUnit: Creating Temporary Files using the TemporaryFolder @Rule

If you have an application that writes out files, how do you test that the generated file is correct?

One approach, is to configure the application to write out to some pre-defined temporary location such as /tmp (on *nix based systems) and then delete the files after the test. But this requires a lot of boilerplate code in your unit tests and can be error prone. Sometimes, developers forget to clean up these temporary files and leave a mess behind. I have also seen cases where unit tests have written temporary files to the current directory (which contains test code) and developers have accidently checked them into source control, which definitely shouldn't happen!

The right way to deal with temporary files in unit tests is by using JUnit's TemporaryFolder Rule. With it, you no longer need to worry about where to create your temporary files or deleting them after the test succeeds or fails. JUnit handles all of that for you.

The following example shows you how to use the TemporaryFolder Rule:

import static org.hamcrest.Matchers.is;
import static org.junit.Assert.assertThat;

import java.io.File;
import java.io.IOException;

import org.apache.commons.io.FileUtils;
import org.junit.Rule;
import org.junit.Test;
import org.junit.rules.TemporaryFolder;

public class MyTest {

  @Rule
  public TemporaryFolder tempFolder = new TemporaryFolder();

  @Test
  public void testWrite() throws IOException {
    // Create a temporary file.
    // This is guaranteed to be deleted after the test finishes.
    final File tempFile = tempFolder.newFile("myfile.txt");

    // Write something to it.
    FileUtils.writeStringToFile(tempFile, "hello world");

    // Read it.
    final String s = FileUtils.readFileToString(tempFile);

    // Check that what was written is correct.
    assertThat("hello world", is(s));
  }
}

JUnit: Naming Individual Test Cases in a Parameterized Test

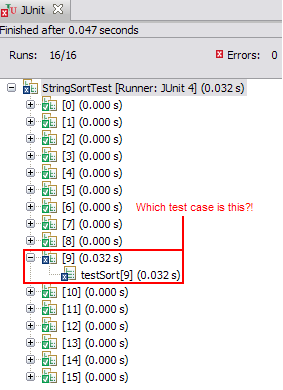
A couple of years ago I wrote about JUnit Parameterized Tests. One of the things I didn't like about them was that JUnit named the invidividual test cases using numbers, so if they failed you had no idea which test parameters caused the failure. The following Eclipse screenshot will show you what I mean:

A parameterised test without names

However, in JUnit 4.11, the @Parameters annotation now takes a name argument which can be used to display the parameters in the test name and hence, make them more descriptive. You can use the following placeholders in this argument and they will be replaced by actual values at runtime by JUnit:

  • {index}: the current parameter index
  • {0}, {1}, ...: the first, second, and so on, parameter value
Here is an example:

import static org.junit.Assert.assertEquals;

import java.util.Arrays;
import java.util.Collection;

import org.junit.Test;
import org.junit.runner.RunWith;
import org.junit.runners.Parameterized;
import org.junit.runners.Parameterized.Parameters;

@RunWith(Parameterized.class)
public class StringSortTest {

  @Parameters(name = "{index}: sort[{0}]={1}")
  public static Collection<Object[]> data() {
    return Arrays.asList(new Object[][] {
          { "abc", "abc"},
          { "cba", "abc"},
          { "abcddcba", "aabbccdd"},
          { "a", "a"},
          { "aaa", "aaa"},
          { "", ""}
        });
  }

  private final String input;
  private final String expected;

  public StringSortTest(final String input, final String expected){
    this.input = input;
    this.expected = expected;
  }

  @Test
  public void testSort(){
    assertEquals(expected, sort(input));
  }

  private static String sort(final String s) {
    final char[] charArray = s.toCharArray();
    Arrays.sort(charArray);
    return new String(charArray);
  }
}
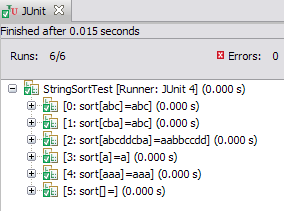
When you run the test, you will see individual test cases named as shown in the Eclipse screenshot below, so it is easy to identify the parameters used in each test case.

A parameterised test with individual test case naming

Note that due to a bug in Eclipse, names containing brackets are truncated. That's why I had to use sort[{0}], instead of sort({0}).

Saturday, March 23, 2013

JAXB MarshalException: Missing an @XmlRootElement Annotation

When marshalling JAXB objects you might get an exception about a missing @XmlRootElement annotation. For example:
javax.xml.bind.MarshalException - with linked exception: 
[com.sun.istack.SAXException2: unable to marshal type "FooType"
as an element because it is missing an @XmlRootElement annotation]
In order to resolve this issue, use the simple binding mode to generate your JAXB classes.

Create the following binding file:

<jaxb:bindings jaxb:extensionBindingPrefixes="xjc" version="2.1"
  xmlns:jaxb="http://java.sun.com/xml/ns/jaxb"
  xmlns:xjc="http://java.sun.com/xml/ns/jaxb/xjc">
  <jaxb:globalBindings>
    <xjc:simple/>
  </jaxb:globalBindings>
</jaxb:bindings>
Pass this file to xjc or wsdl2java using the -b option.

You should now see @XmlRootElement annotations on your classes.

Saturday, February 23, 2013

Comparing CSV Data Files Using SQLite

Whenever I have to compare large datasets generated by two different environments, such as Production and QA, I tend to load the data into a SQLite database first and then run SQL queries to diff the data.

The code below shows how you can import CSV files into SQLite:

-- create the tables to hold the data
CREATE TABLE dataProd (id text, price numeric);
CREATE TABLE dataQA   (id text, price numeric);

-- import the data
.separator ","
.import /path/prod/data.csv dataProd
.import /path/qa/data.csv dataQA

.headers ON

-- find differences between data
SELECT p.id,
       p.price as prodPrice,
       q.price as qaPrice,
       abs(p.price-q.price) as diff
FROM dataProd p, dataQA q
WHERE p.id = q.id
AND p.price <> q.price

Sunday, February 17, 2013

Retrying Operations using Spring's RetryTemplate

Back in 2009, I blogged about Retrying Operations in Java in which I covered three different approaches to retrying operations on failure. Here is another alternative:

If your application is using Spring then it is easier to use the Spring Framework's RetryTemplate.

The example below shows how you can use a RetryTemplate to lookup a remote object. If the remote call fails, it will be retried five times with exponential backoff.

// import the necessary classes
import org.springframework.batch.retry.RetryCallback;
import org.springframework.batch.retry.RetryContext;
import org.springframework.batch.retry.backoff.ExponentialBackOffPolicy;
import org.springframework.batch.retry.policy.SimpleRetryPolicy;
import org.springframework.batch.retry.support.RetryTemplate;
...

// create the retry template
final RetryTemplate template = new RetryTemplate();
template.setRetryPolicy(new SimpleRetryPolicy(5));
final ExponentialBackOffPolicy backOffPolicy = new ExponentialBackOffPolicy();
backOffPolicy.setInitialInterval(1000L);
template.setBackOffPolicy(backOffPolicy);

// execute the operation using the retry template
template.execute(new RetryCallback<Remote>() {
  @Override
  public Remote doWithRetry(final RetryContext context) throws Exception {
    return (Remote) Naming.lookup("rmi://somehost:2106/MyApp");
  }
});
Related Posts:
Retrying Operations in Java

Saturday, February 16, 2013

stackoverflow - 50k rep

Five months after crossing the 40k milestone, I've now reached a reputation of 50k on stackoverflow!

The following table shows some stats about my journey so far:

0-10k 10-20k 20-30k 30-40k 40-50k Total
Date achieved 01/2011 05/2011 01/2012 09/2012 02/2013
Questions answered 546 376 253 139 192 1506
Questions asked 46 1 6 0 1 54
Tags covered 609 202 83 10 42 946
Badges
(gold, silver, bronze)
35
(2, 10, 23)
14
(0, 4, 10)
33
(2, 8, 23)
59
(3, 20, 36)
49
(0, 19, 30)
190
(7, 61, 122)
As I mentioned before, I have really enjoyed being a member of stackoverflow. For me, it has not simply been a quest for reputation, but more about learning new technologies and picking up advice from other people on the site. I like to take on challenging questions, rather than the easy ones, because it pushes me to do research into areas I have never looked at before, and I learn so much during the process.

Next stop, 60k!

Saturday, February 09, 2013

Selecting Specific Lines of a File Using Head, Tail and Sed

This post contains a few handy commands used to select specific lines from a file.

Print the first N lines

head -N file
Print the last N lines
tail -N file
Print all EXCEPT the first N lines
tail +$((N+1)) file
Print all EXCEPT the last N lines
head -n -N file
Print lines N to M (inclusive)
sed -n 'N,Mp' file
Print line N
sed 'Nq;d' file
Print all EXCEPT line N
sed 'Nd' file
Print multiple lines, I, J, K etc
Assuming I > J > K:
sed 'Ip;Jp;Kq;d' file
The last q tells sed to quit when it reaches the Kth line instead of looping over the remaining lines that we are not interested in.

Saturday, February 02, 2013

Guava Table

Guava's Table<R, C, V> is a useful alternative to nested maps of the form Map<R, Map<C, V>>. For example, if you want to store a collection of Person objects keyed on both firstName and lastName, instead of using something like a Map<FirstName, Map<LastName, Person>>, it is easier to use a Table<FirstName, LastName, Person>.

Here is an example:

final Table<String, String, Person> table = HashBasedTable.create();
table.put("Alice", "Smith", new Person("Alice", "Smith"));
table.put("Bob", "Smith", new Person("Bob", "Smith"));
table.put("Charlie", "Jones", new Person("Charlie", "Jones"));
table.put("Bob", "Jones", new Person("Bob", "Jones"));

// get all persons with a surname of Smith
final Collection<Person> smiths = table.column("Smith").values();

// get all persons with a firstName of Bob
final Collection<Person> bobs = table.row("Bob").values();

// get a specific person
final Person alice = table.get("Alice", "Smith");

Sunday, January 06, 2013

Coursera class: Functional Programming Principles in Scala

I thought I'd mention that one of my highlights of last year was completing the "Functional Programming Principles in Scala" class led by Martin Odersky, the designer of Scala. This Coursera class started in September 2012 and was around 7 weeks long. Learning about functional programming was a rewarding experience and I found the course and assignments quite challenging, but immensely enjoyable. I even managed to get a distinction! I believe this course will be running again this year and I'd highly recommend it to people who wish to discover functional programming and Scala.

I have committed my assignment solutions to my GitHub repository.

I am now looking forward to starting some new classes in 2013!

Related posts:
Stanford's Online Courses: ml-class, ai-class and db-class

Tuesday, January 01, 2013

fahd.blog in 2012

Happy 2013!
I'd like to wish everyone a great start to an even greater new year!

During 2012, I posted 31 new entries on fahd.blog. I am also thrilled that I have more readers from all over the world too! Thanks for reading and especially for giving feedback.

Top 5 posts of 2012:

I'm going to be writing a lot more this year, so stay tuned for more great techie tips, tricks and hacks! :)